Signed in as:
filler@godaddy.com
Signed in as:
filler@godaddy.com
Good Day or Evening to you! Thank you for visiting my website! I want to use this opportunity to introduce you to the different types of tumblers that are available on this site. First of all, why buy tumblers? Tumblers are very eco-friendly as they are durable and you can use them over and over again. They are beautiful and you can accessorize your “look” by choosing one that matches your outfit or mood. They will fit easily in most beverage cup holders in automobiles, camp chairs and most of all… in your hands. There are three types of tumblers I make.

The first type is what I call the Basic Tumbler Shape. This type usually is about 2-2.5 inches across at the bottom to easily fit most cup holders. It gradually tapers wider towards the top to fit a 3 in silicone travel lid securely. Although I consider this a basic shape, there is nothing basic about this tumbler. I usually will apply and interesting glaze finish and or texture detail. Here is an example of my basic shaped tumblers.
I used a beautiful combination of 3 glazes to get this explosion of crystal like “clouds”. There is nothing basic about making a basic shape. Special care is made to make sure the rim on top will fit the travel lid. Clay has different shrinkage rates and the measurement is very specific while shaping the tumbler on the wheel.

Handled Tumblers can be in the basic or hourglass shape. I added handles on the upper portion of the tumbler so that it will still fit into most beverage holders. Ceramics will get a bit hot when holding hot beverages. These handled tumblers were made for those who prefer not to use a silicone sleeve or cozy to keep their hands from getting too hot. Here are some examples of handled tumblers.
So there you have it… the main types of tumblers available on my site! I also have non ceramic accessories to use with these tumblers. Please check into my article to find out more about how to use these accessories! Thanks again for visiting my site. Hey… check out my video on YouTube if you are more of an auditory person or would like the full audio and visual experience! https://studio.youtube.com/video/blC4lwvzm2A/edit
Kokeshi, are Japanese dolls, originally from northern Japan. They are handmade from wood, have a simple trunk and an enlarged head with a few thin, painted lines to define the face. The body has a floral design painted in red, black, and sometimes yellow, and covered with a layer of wax. One characteristic of kokeshi dolls is their lack of arms or legs. The bottom is marked with the signature of the artist.
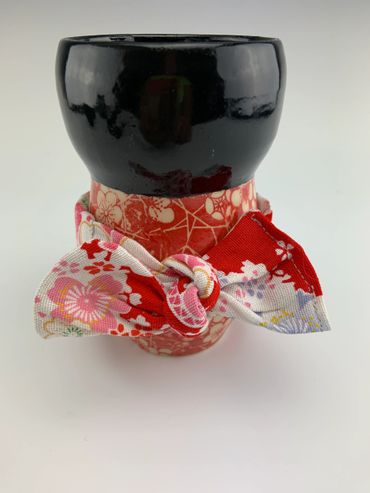
My Kokeshi Tumblers are made from ceramic. Although the general shape seems simple, the process of shaping and hand decorating each Kokeshi tumbler takes hours and hours. I may use a combination of handpainting, stencils, application of underglaze decals, ombre air spray application of underglaze and glazes. Some designs will require up to 4 firings to get the desired result. Here are some examples of my Kokeshi Tumblers. This is my original design and each is truly one of a kind and a work of art from my heart!

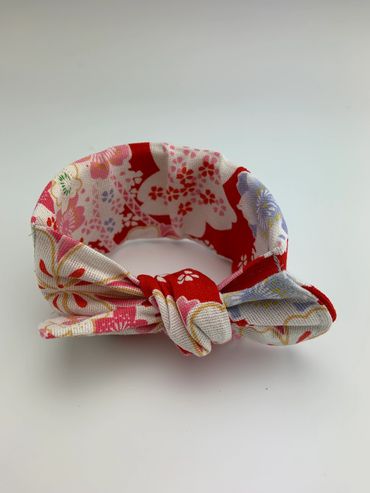
Handmade Obi Cozies. I am a ceramicist and not a seamstress. With that in mind, I made a fun and simple design that goes well with my Kokeshi Tumblers. I call these my Obi Cozies and they are used to help reduce the transfer of heat from the tumbler onto your finger tips. What is an Obi?
obi in American English
(ˈoʊbi)
NOUN
a broad sash with a bow in the back, worn with a Japanese kimono
Webster’s New World College Dictionary, 4th Edition. Copyright © 2010 by Houghton Mifflin Harcourt. All rights reserved.
I have two sizes available (mainly due to the length of the material I was able to secure). They come in either (approximately) 18 inches or 21 inches long. To use this type of cozy, you simply bring the ends together to make a double knot. After knotted, pull on and shape the ends to make it look like a bow. Then slip the cozy from the bottom of an empty tumbler towards the top until it fits snugly. Another approach is to tie the cozy directly onto the tumbler. I usually prefer the first method so that I don’t accidently bump or drop the tumbler while tying the knot. Sometimes you will prefer to make a triple knot when using the 21 inch cozy so that the ends look like a neat bow. The kokeshi cozies have a double layer of craft foam inside to insulate from heat. They are also treated with water and stain repellant (Bayes Fabric Protectant). I do not recommend using a traditional clothes washer or soaking to clean them since moisture may get trapped between the craft foam layers. The fabric repellant should help prevent any coffee stains. If you must… you can choose to blot clean with a warm soapy towel (however the fabric protectant may get compromised with repeated blotting). When purchasing one of these, bear in mind that I am not a seamstress, so some of the lines will not be completely straight. You are purchasing for the convenience of not having to make one for yourself, the original design (I came up with this myself), the stain repellent treatment the quality control (even though my lines might not be completely straight, I check each one to make sure they are stitched securely).


Accessories for my Tumbler collection include silicone travel lids, heat resistant silicone sleeves and hand made cozies.
Silicone travel lids. The three inch lid fits snugly inside the opening of the tumbler. To attach, simply push the lid into the tumbler. There is a ridge along the top of the lid that keeps the lid from completely co
Accessories for my Tumbler collection include silicone travel lids, heat resistant silicone sleeves and hand made cozies.
Silicone travel lids. The three inch lid fits snugly inside the opening of the tumbler. To attach, simply push the lid into the tumbler. There is a ridge along the top of the lid that keeps the lid from completely collapsing into the tumbler. Some lids may have a tighter fit. You may need to push and pump on the top of the lid and then twist it so that the inner lower portion in completely and securely attached to the inside of the tumbler.

The first pic is the correct orientation in which you will place onto the tumbler, the second photo shows how the underside has ridges to trap the liquid, preventing spillage. You can also see that the top is wider than the bottom so that it fits into place on top of the tumbler. Push the lid in until it cannot go in any further without excessive force as shown in the third picture.

Heat Resistant Silicone Sleeves help protect your fingers from heat. It is important to place the sleeve on while the tumbler is empty (before filling with fluids). Simply, stretch the sleeve onto the tumbler at the desired height for comfort.
Thanks for visiting my site and reading this. If you are more of a multisensory person, I do have a video on You Tube that shows and explains the different tumbler designs and how to use the accessories! https://studio.youtube.com/video/blC4lwvzm2A/edit